# Tone Library #
----
## Description ##
This is an Arduino Library to produce square-wave of the specified frequency (and 50% duty cycle) on any Arduino pin.
A duration can optionally be specified, otherwise the wave continues until `stop()` is called.
The pin can be connected to a piezo buzzer or other speaker to play tones.
Be sure to try out the RTTTL (RingTone Text Transfer Language) example!
### Arduino Core Version ###
A simplified version of the Tone library has been incorporated into the Arduino core since 0018. It only provides a single tone (since only one timer is used). You can find the core documentation [here](http://arduino.cc/en/Reference/Tone).
Check out the [tutorial](http://itp.nyu.edu/physcomp/labs/labs-arduino-digital-and-analog/tone-output-using-an-arduino/) by Tom Igoe at NYU's Interactive Telecommunications Program (ITP). It demonstrates how to use the core `tone()` and `noTone()` commands.
### _WARNING_ ###
*_Do not connect the pin directly to some sort of audio input. The voltage is considerably higher than a standard [line level voltages](http://en.wikipedia.org/wiki/Line_level), and can damage sound card inputs, etc. You could use a voltage divider to bring the voltage down, but you have been warned._*
*_You MUST have a resistor in line with the speaker, or you WILL damage your controller._*
----
## Download and Installation ##
* [Tone Library - Latest Version](https://github.com/bhagman/Tone/archive/master.zip)
Unzip the folder and rename it to `Tone`, then move it to your `arduinosketchfolder/libraries/` folder.
----
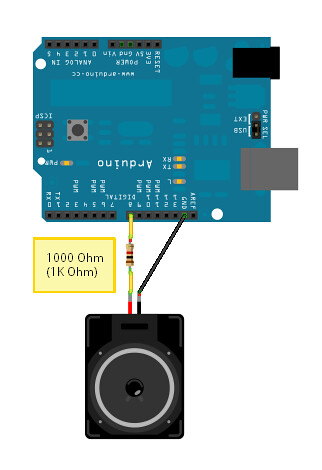
## Hardware Connections/Requirements ##
* Just connect the digital pin to a speaker (with a resistor - say 1K - in line), and the other side of the speaker to ground (GND).
|
 |
* You can use a potentiometer to control the volume. Use a 10K Ohm potentiometer (variable resistor) in line with the 1K Ohm resistor connected to the speaker.
* Using this library will affect usage of the PWM outputs, so be aware.
* Also, although it's the last timer to be allocated, timer 0 (which is used for `millis()` among other things) will be affected if used.
----
## Library Usage ##
### Instantiation/Creation ###
```arduino
Tone tone1;
void setup(void)
{
tone1.begin(13);
}
```
### Properties ###
* No properties.
### Methods ###
* `begin(`_*`pin`*_`)` - prepares a pin for playing a tone.
* `isPlaying()` - returns `true` if tone is playing, `false` if not.
* `play(`_*`frequency`*_` [, `_*`duration`*_`])` - play a tone.
* _*`frequency`*_ is in Hertz, and the _*`duration`*_ is in milliseconds.
* _*`duration`*_ is optional. If _*`duration`*_ is not given, tone will play continuously until _*`stop()`*_ is called.
* `play()` is [non-blocking](http://en.wikipedia.org/wiki/Non-blocking_synchronization). Once called, `play()` will return immediately. If _*`duration`*_ is given, the tone will play for that amount of time, and then stop automatically.
* `stop()` - stop playing a tone.
### Constants ###
Below is a list of constant values of frequencies for notes. (These are included in the library).
e.g.
```arduino
tone1.play(NOTE_B3);
```
#### Musical Notes ####
| *Constant Name* | *Frequency (Hz)* |
|-----------------|------------------|
| NOTE_B0 | 31 |
| NOTE_C1 | 33 |
| NOTE_CS1 | 35 |
| NOTE_D1 | 37 |
| NOTE_DS1 | 39 |
| NOTE_E1 | 41 |
| NOTE_F1 | 44 |
| NOTE_FS1 | 46 |
| NOTE_G1 | 49 |
| NOTE_GS1 | 52 |
| NOTE_A1 | 55 |
| NOTE_AS1 | 58 |
| NOTE_B1 | 62 |
| NOTE_C2 | 65 |
| NOTE_CS2 | 69 |
| NOTE_D2 | 73 |
| NOTE_DS2 | 78 |
| NOTE_E2 | 82 |
| NOTE_F2 | 87 |
| NOTE_FS2 | 93 |
| NOTE_G2 | 98 |
| NOTE_GS2 | 104 |
| NOTE_A2 | 110 |
| NOTE_AS2 | 117 |
| NOTE_B2 | 123 |
| NOTE_C3 | 131 |
| NOTE_CS3 | 139 |
| NOTE_D3 | 147 |
| NOTE_DS3 | 156 |
| NOTE_E3 | 165 |
| NOTE_F3 | 175 |
| NOTE_FS3 | 185 |
| NOTE_G3 | 196 |
| NOTE_GS3 | 208 |
| NOTE_A3 | 220 |
| NOTE_AS3 | 233 |
| NOTE_B3 | 247 |
| NOTE_C4 | 262 |
| NOTE_CS4 | 277 |
| NOTE_D4 | 294 |
| NOTE_DS4 | 311 |
| NOTE_E4 | 330 |
| NOTE_F4 | 349 |
| NOTE_FS4 | 370 |
| NOTE_G4 | 392 |
| NOTE_GS4 | 415 |
| NOTE_A4 | 440 |
| NOTE_AS4 | 466 |
| NOTE_B4 | 494 |
| NOTE_C5 | 523 |
| NOTE_CS5 | 554 |
| NOTE_D5 | 587 |
| NOTE_DS5 | 622 |
| NOTE_E5 | 659 |
| NOTE_F5 | 698 |
| NOTE_FS5 | 740 |
| NOTE_G5 | 784 |
| NOTE_GS5 | 831 |
| NOTE_A5 | 880 |
| NOTE_AS5 | 932 |
| NOTE_B5 | 988 |
| NOTE_C6 | 1047 |
| NOTE_CS6 | 1109 |
| NOTE_D6 | 1175 |
| NOTE_DS6 | 1245 |
| NOTE_E6 | 1319 |
| NOTE_F6 | 1397 |
| NOTE_FS6 | 1480 |
| NOTE_G6 | 1568 |
| NOTE_GS6 | 1661 |
| NOTE_A6 | 1760 |
| NOTE_AS6 | 1865 |
| NOTE_B6 | 1976 |
| NOTE_C7 | 2093 |
| NOTE_CS7 | 2217 |
| NOTE_D7 | 2349 |
| NOTE_DS7 | 2489 |
| NOTE_E7 | 2637 |
| NOTE_F7 | 2794 |
| NOTE_FS7 | 2960 |
| NOTE_G7 | 3136 |
| NOTE_GS7 | 3322 |
| NOTE_A7 | 3520 |
| NOTE_AS7 | 3729 |
| NOTE_B7 | 3951 |
| NOTE_C8 | 4186 |
| NOTE_CS8 | 4435 |
| NOTE_D8 | 4699 |
| NOTE_DS8 | 4978 |
### Quick example ###
Play a 440 Hz - musical note of 4^th^ octave A - on pin 13:
```arduino
#include
Tone tone1;
void setup()
{
tone1.begin(13);
tone1.play(NOTE_A4);
}
void loop()
{
}
```
----
## Ugly Details ##
The library uses the hardware timers on the microcontroller to generate square-wave tones in the audible range.
You can output the tones on any pin (arbitrary). The number of tones that can be played simultaneously depends on the number of hardware timers (with CTC capability) available on the microcontroller.
* ATmega8: 2 (timers 2, and 1)
* ATmega168/328: 3 (timers 2, 1, and 0)
* ATmega1280: 6 (timers 2, 3, 4, 5, 1, 0)
The timer order given above is the order in which the timers are allocated. Timer 0 is a sensitive timer on the Arduino since it provides `millis()` and PWM functionality.
The range of frequencies that can be produced depends on the microcontroller clock frequency and the timer which is being used:
|*MCU clock*|*8 bit timer Flow*|*16 bit timer Flow*|*Fhigh*|
|-----------|--------------------|---------------------|---------|
|8 MHz |16 Hz |1 Hz (1/16 Hz) |4 MHz |
|16 MHz |31 Hz |1 Hz (1/8 Hz) |8 MHz |
Although Fhigh can go as high as 8 MHz, the [human hearing range](http://en.wikipedia.org/wiki/Hearing_range#Humans) is typically as high as 20 kHz.
Tone accuracy is dependent on the timer prescalar. Frequency quantization occurs as the frequencies increase per prescalar.
If you used a 16 bit timer (e.g. timer 1, or timers 3,4,5 on '1280), you could generate "tones" down to 1/8 Hz (one cycle every 8 seconds), although the library only accepts integers for frequency.
After all is said and done, because `play()` only accepts unsigned integers for frequency, the maximum frequency that can be produced is 65535 Hz - which, after rounding, results in a 65573.77 Hz "tone" on a 16 MHz part. Even if play accepted larger values for frequency, you couldn't achieve better than around 80KHz with the Tone library because the pin toggling is done in software. Each toggle, in software, requires _AT LEAST_ 50+ cycles.
----
## Links ##
### Projects/Examples Using Tone Library and Wiring Framework Version of `tone()` ###
* [Tom Igoe - Tone Output using an Arduino](http://itp.nyu.edu/physcomp/labs/labs-arduino-digital-and-analog/tone-output-using-an-arduino/)
* [Evan Kale - Build Your Own Metal Detector with an Arduino](http://www.allaboutcircuits.com/projects/metal-detector-with-arduino/)
### RTTTL Sites ###
* http://merwin.bespin.org/db/rts/index.php
* http://www.cellringtones.com/
* http://arcadetones.emuunlim.com/
### Other ###
* [Arduino sketch for high frequency precision sine wave tone sound synthesis](http://www.adrianfreed.com/content/arduino-sketch-high-frequency-precision-sine-wave-tone-sound-synthesis)